
Securing a Virtual Desktop Environment in a Public Cloud - Part 2


This has turned out to be quite the learning adventure. Much more so than I had envisioned. I thought it would be 'simple' to just deploy NSX Cloud to our existing Horizon Cloud environment and we would easily have another security layer available enabling extended use cases to take advantage of our Virtual Desktop Infrastructure (VDI) platform.
As I wrote in Part 1, we were having difficulties deploying NSX cloud in our Azure environment for a brownfield Horizon Cloud deployment. After much trial and error, I decided the best thing to do was to create a new, dedicated Azure subscription and deploy NSX Cloud there in a greenfield environment with a couple of virtual machines (vm). This way NSX could have all the rights it needed at the subscription level and since this wasn't an indus or production VDI environment there would be no impact as we learned. I could create and destroy vm's as needed to test and validate NSX Cloud functionality as well as knowing and understand what the effect was for each action performed with the Public Cloud Gateway (PCG) installation and NSX management of a vm.
Initial Deployment
As I mentioned above, we created a new subscription that we would allow NSX Cloud to manage. The subscription was linked to the NSX Cloud Service Manager (CSM) and NSX role assignments were deployed using the VMWare provided PowerShell script like last time. The Public Cloud Gateway (PCG) was then deployed to the virtual network (vnet) created in this new subscription. I think it's important to note that when you deploy your PCG to your subscription you need the ability to create a private Domain Name Service (DNS) zone. The PCG deployment will try and create this automatically and if it can't there is no error message to let you know this failed that I could find. I discovered that I was missing this very important piece when I could not install NSX Tools on the vm's and saw that DNS requests were going unanswered. If you need to create a private DNS zone manually here is the kb I discovered https://kb.vmware.com/s/article/81158 that was helpful for me.
The screenshots below show our successful subscription link to the CSM and our succesful PCG deployment.
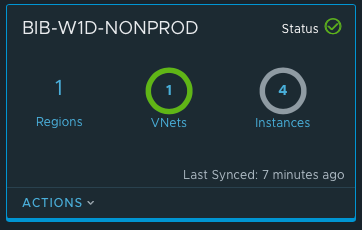
In the screenshot above the 4 instances are shown in gray as I have the vms automatically shut down every night and this was taken before I started them.

It's important to note that in the above screenshot Quarantine State is set to Off. I would recommend this as the initial setting for brownfield deployments just to be sure you don't accidentally block (quarantine) vms.
I quickly spun up a couple of Windows desktop vms and then proceeded to successfully install NSX Tools on the vm. I manually added the tag of nsx.network:default to each of these vms. It's important to note that since I selected 'Manage with NSX Tools - On' when deploying the PCG that I did not see the NSX rules get translated to the Network Security Group (NSG's) applied to the vm. This is expected behavior. To see the NSX rules in play on the vm you need to use the nsxcli tool installed on the vm. The first thing I would check is the gateway connection status. This is shown in the screenshot below:
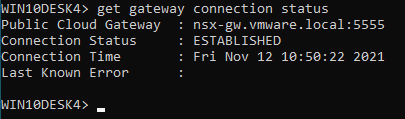
The screenshot above shows that I have an established connection to the nsx gateway deployed in my vnet (Connection Status : Established). Another way to check for a 'healthy' vm is, in Azure look at the network interface for the vm and see if it is in the vm-underlay-sg security group. If it is then you are golden. If it's not there, then you will most likely find it in the default-vnet-<vnet id>-sg group as this is where NSX managed vms with errors get put and you have to work to do to figure out the issue.
An updated look at the subscription in the CSM shows a different picture now since there are vms that are under management of NSX as shown in the screenshot below:
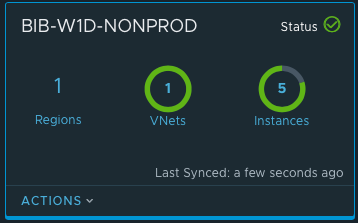
You can see when comparing views from earlier to this one that now I have 5 instances and most of the circle is green. I did add one new vm since the previous screen shot and made it user managed. The other four vms are under NSX control and therefore represent the green in the circle above while the gray is a vm that is User Managed (not under NSX).
NSX Management with Stand Alone Windows 10 Desktops
This initial setup is with standalone native Azure Windows 10 Desktops. I chose this path to become more familiar with what actions trigger what results. The knowledge gained here can then be carried over to implementing NSX Cloud on our Horizon Cloud VDI environment.
I installed NSX Tools manually on the vms I had created. I followed the NSX Tools Download and Installation instructions which can be found by navigating to the vnet you are managing in the Cloud Security Manager and then click on it. It is good to know how to do this process manually.
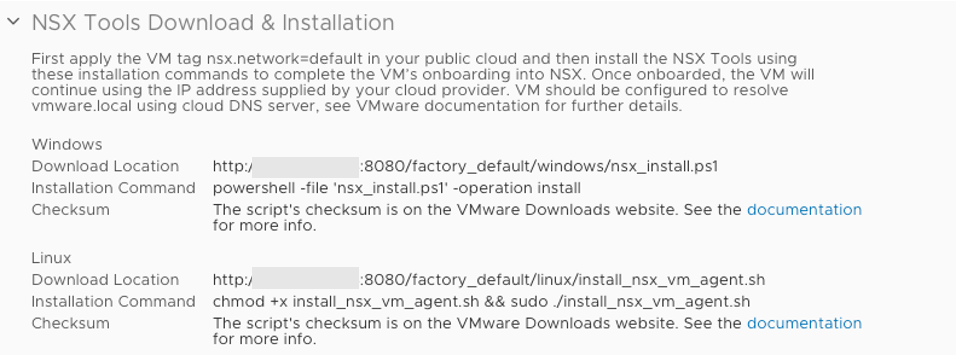
- Reminder: the vm must have the tag nsx.network:default applied in order to be fully NSX managed
NSX Tools appears to consume quite a bit of resources on a Windows 10 Desktop. Here is the CPU utilization on three models I tested with NSX Tools installed on a store version of Windows 10 Pro (20h2-pro-g2):
- D2Sv3 (2 vCPU) : 90%
- D4Sv3 (4 vCPU) : 50% or less
- D8Sv3 (8 vCPU) : 20%
From my view implementing NSX Tools on a D2Sv3 should not be done. Use a D4 if you must but limit the use cases to just browser-based applications like O365 or the user experience may not be what you would like it be. NSX on a D8 should not impact the user experience much unless they are an intensive developer.
- NOTE: The above CPU percentages were only seen with the nsx.network:default tag applied to the vm. On vm where I had NSX Tools installed and high CPU usage if I removed the tag the CPU % decreased dramatically as it was no longer under NSX enforcement even though NSX Tools was still installed on the local vm.
For sure some deeper investigation should be done to understand why NSX Tools is taking up so much CPU resource as this may/may not be 'normal'.
Now that I have the vms visible to NSX I can begin creating firewall rules for these vms. One nice feature that I failed to mention previously is that during the deployment of the Public Cloud Gateway (PCG) you should enable the feature Discover Cloud Tags. This will enable you to more simply group your vms based on existing Horizon Cloud defined tags as they will be discovered by NSX. You just create NSX Security Groups based on dis:azure:vmw-hcs-pool-name <tag> and you can group your desktops by Horizon Cloud pool name. An example of a discovering a cloud tags is shown below (not Horizon tags but manual tags as these are stand-alone desktops I am testing with) on the right of the screen shot:

Using these discovered tags from Azure I can build security groups that easily grouped my simulated VDI desktops as shown below:

NSX rules creation is now based on groups with tagged servers like this one to prevent vm to vm flows:

The intent of the first rule to prevent any vm to vm (east-west traffic) from vms in this group. The servers in this group called Scott are WIN10Desk1, WIN10Desk2, WIN10Desk3-UM, WIN10Desk4 and WIN10Desk-5. By applying this rule to the SG-Scott group it applies it to the vm's defined in that group.
As a simple test, attempting to ping from WINDESK4 to WINDESK5 in the group I get the following results:
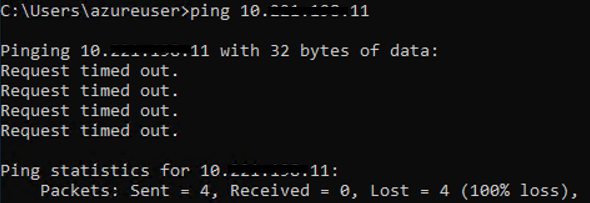
The above ping test was caught by the DropEW rule which is preventing any flows from any vm in the group SG-Scott to any vm in the group SG-Scott. This is exactly what I would expect. Since I have the second and third octet hidden you will have to trust me that I pinged the correct IP address.
When I try to ping WINDESK3-UM (Which is Unmanaged) from WINDESK4 I get the following results:
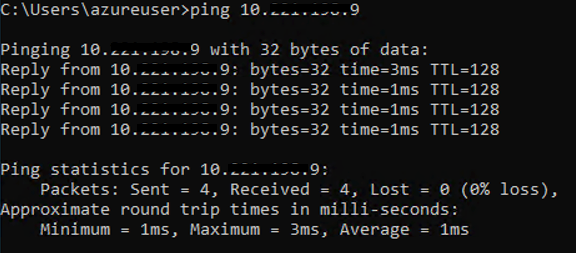
The above ping test worked as WINDESK3-UM is an unmanaged vm and therefore not managed by NSX. It does not contain the required tag to be part of the group SG-Scott nor does it contain the nsx.network:default tag so it did not meet requirements of the Drop EW rule and then allowed on the next rule Allow Ping.
This is an important first test as I/we need to ensure we can control and/or limit east-west traffic to what's needed for segmentation of our external partners within our VDI environment
You can see how it will be important to define and use tags in Azure that make sense and can be easily translated to NSX Security Groups.
Below shows the expanded policy I have created for these vms in Azure under NSX management:
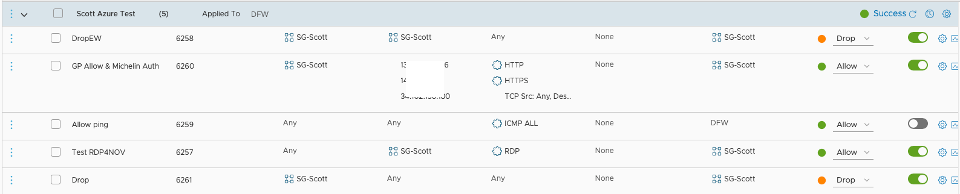
As mentioned previously the first rule to to drop East-West traffic (vm to vm) and I have applied that to all servers in the SG-Scott Security Group. As mentioned to be part of this group the vm needs to have the tag of ST:owner:Scott
The second rule relates to some authentication flows and is actually not a good rule since I am using IP addresses instead of security groups. Since this was only a test, I can live with not doing things 'right'. Again, this is applied to all vm's in the SG-Scott group.
You can see Ping test rule as rule 3 but it is currently disable as the toggle switch to the right is gray not green.
The fourth rule allows RDP from any source to a server in the SG-Scott group. It is also applied to SG-SCott group only. I think it's important to note here, these vms were not built to allow access from the Internet. It's also important to note that the ability to create this exact rule sets the foundation for the next section on Behavior Change. Hopefully it will be clear why.
The last rule is the standard drop any rule if not already defined. At this point I have defined specifically what traffic I will allow in and out of the vm. This is the complement to our existing security I was looking for as now we can control and segment the traffic before it hits the network not after. In my opinion this is a great compliment on top of our existing Azure security (security in layers).
Behavior Change

As I mentioned previously, when you install the PCG and choose to manage with NSX Tools there is no translation happening to or from the existing Azure Security Group rules. If you are deploying NSX Cloud into an environment that is a becoming a shared support environment like our this will require communication and understanding between the teams. Why?? For example, once a vm is managed by NSX and NSX Tools the NSX firewall rules applied to it at are at the NSX agent on the vm and not at the nsg managed by azure. In the event of troubleshooting a connectivity issue this is imperative to know. If a user is having an issue trying to Telnet to a vm and the nsg rules applied at the nic don't specify that it's allowed, the cloud support team could state that is the reason it's not working and it's by design. This however may not be the real root cause. If the vm has a rule allowing Telnet via NSX Cloud but the Telnet server is not started on the vm this is the real root cause. Start the Telnet server and the user will be able to telnet to the vm.
This is the kind of behavior change I am talking about that needs to happen in this shared support environment. With NSX Tools I feel it's very important to communicate and communicate some more so that everyone involved understands what and where the security controls are happening. I feel that NSX Cloud is a great complement to our existing cloud security features and processes, and adds another security layer but with this additional layer comes the increased responsibility of communication and change.
Next
I think that I/We are now at a point that we can install a PCG in our existing Horizon Cloud INDUS environment without impacting the existing service as I/We better understand what happens when. That will be the next step, putting our INDUS VDI environment under NSX management and adding this additional layer of security. I will probably start off with all existing vms being User Managed and create a new pool of desktops that are NSX managed and have NSX Tools automatically installed. This should keep me busy over the holidays! Part 3 of this series should detail how I was able to do that.

Special Thanks
Again, without people like @Mike Wilder and @Jean-Francois Coutier (VMware) for NSX assistance and knowledge, and @Okan Aslaner, @Andy Thompson and @Alexis Plantin for Azure assistance and knowledge. Without the patience of these people I would not have been able to achieve what has been accomplished so far.